
USER GUIDE AND TUNING INSTRUCTIONS
THANK YOU FOR CHOOSING DIVINE ACOUSTICS ANTI-VIBRATION FEET!
INTRODUCTION
Galileo Isolation Feet have been designed to improve the quality of sound reproduction in audio components such as CD/SACD players, digital-to-analog converters (DACs), preamplifiers, integrated amplifiers, power amplifiers and turntables.
Their purpose is to reduce the influence of unwanted mechanical vibrations generated both inside the component itself and transmitted from the supporting surface on which it is placed. The Galileo structure absorbs and dissipates the energy of these vibrations before they can interfere with the component’s operation.
The multi-layer construction of Galileo, combined with carefully selected materials featuring different mechanical properties, effectively limits vibration transmission and reduces vibration-induced distortions within the audio component. The result is greater transparency, improved dynamics, higher resolution, and a more stable and natural soundstage.
The defining feature of Galileo is its ability to be precisely tuned to match the individual resonance characteristics of each audio component. When properly adjusted, Galileo allows the anti-vibration system to operate at maximum efficiency, providing the component with optimal mechanical operating conditions.
WARNINGS AND OPERATING RECOMMENDATIONS
WARNING!
Never immerse Galileo Isolation Feet in water or any other liquid. Doing so may damage the internal damping layers and lubricants used within the construction. Clean the feet only with a soft, slightly damp cloth. Do not use agressive detergents, solvents or other chemical cleaning agents.
WARNING!
Do not loosen or remove any of the external screws visible on Galileo Isolation Feet. These screws are used solely for assembling the individual structural modules. Attempting to remove them may result in permanent damage to the isolation foot.
WARNING!
A slight amount of play between the individual layers of Galileo, a small degree of movement of the upper section, and the subtle sounds that may occur during handling or height adjustment are normal and should not be considered defects.
These engineered clearances are an intentional part of the design and are essential for the proper operation of the anti-vibration system.
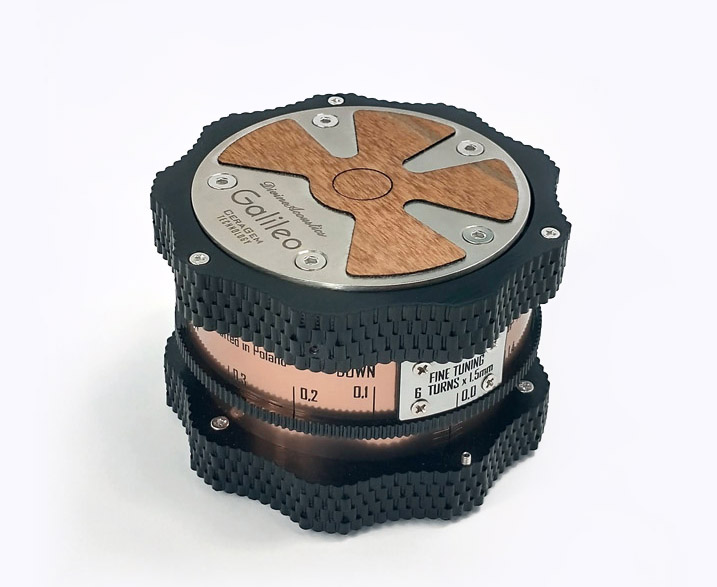
PRODUCT OVERVIEW

A. Upper Contact Surface
The upper contact surface rotates independently of the adjustment ring.
This prevents scratches to both the audio component and the isolation foot during height adjustment.
As a result, the height of Galileo can be adjusted without lifting the supported component.
B. Adjustment Ring
The adjustment ring is used to tune Galileo Isolation Feet to the resonance characteristics of the supported component.
Starting from the lowest position, the ring can be rotated a maximum of six full turns counter-clockwise.
Each full rotation increases the height of the foot by 1.5 mm.
C. Adjustment Scale
The adjustment scale allows precise determination of the current height setting of each Galileo Isolation Foot.
The vertical scale is marked from 0.0 to 1.4.
Each graduation corresponds to a height change of 0.1 mm, while one complete rotation corresponds to 1.5 mm of height adjustment.
An additional horizontal scale on the inner ring makes it easy to keep track of the total number of full rotations.
D. “0” Reference Mark
The “0” reference mark makes it easy to identify the current setting of each isolation foot.
When installing Galileo, we recommend positioning all feet so that the reference marks remain visible. This greatly simplifies subsequent adjustments and allows the settings of all feet supporting the component to be compared at a glance.
Adjustment and “fine-tuning”
To achieve maximum performance, Galileo Isolation Feet must be tuned to the resonance characteristics of the audio component they support.
Every audio component has its own unique resonance profile, determined by factors including its mass, dimensions, chassis construction, materials and the internal distribution of its components.
Consequently, even two components with identical weight may require different Galileo settings if their construction differs. Likewise, components of similar size but made from different materials will exhibit different resonance characteristics.
For this reason, it is impossible to determine the correct Galileo setting based solely on the component’s weight. Weight serves only as an approximate starting point for the adjustment process.
The final setting should always be determined through listening tests.
Galileo has been designed so that its highest position corresponds to lightweight components weighing approximately 1–3 kg. As component weight increases, the optimum setting gradually moves lower. The lowest position is intended for components weighing approximately 70–80 kg.
This exceptionally wide adjustment range allows Galileo to be optimized for the vast majority of audio components while maintaining maximum vibration control performance.
HOW TO EVALUATE GALILEO DURING TUNING
Achieving the best performance from Galileo Isolation Feet requires patience and careful listening. Even very small height adjustments can influence the way your audio system reproduces music, so it is important to make changes gradually and carry out listening tests under consistent conditions.
We recommend using recordings that you know well. Ideally, choose music featuring vocals, acoustic instruments and passages with a wide dynamic range.
Always compare settings at the same listening volume. Differences in playback level can create the impression of improved sound quality, making it more difficult to evaluate the actual effects of the adjustment.
After each adjustment, allow the system a short moment to settle before listening again. Then compare the same musical passage with the previous setting. Focus primarily on the naturalness of the presentation, tonal balance, dynamic expression and the ease with which individual instruments and voices can be followed.
Do not judge the results solely by the amount of detail you hear. An apparent increase in detail does not always translate into a more natural musical presentation. Properly adjusted Galileo Isolation Feet should improve resolution while preserving tonal balance and enhancing the overall musicality of the system. The best setting is the one that allows your attention to remain focused on the music itself rather than on the sound of the audio system.
INITIAL LISTENING SESSION – DETERMINING THE ADJUSTMENT RANGE
The objective of the first listening session is not to find the perfect setting immediately, but to determine the adjustment range within which the optimum setting is likely to be found.
The easiest way to achieve this is by comparing two clearly different height settings.
For a component weighing approximately 10 kg, we recommend starting with 3 full turns above the lowest position, followed by 5 full turns.
For a component weighing approximately 30 kg, a good starting point is 2 full turns, followed by 3½–4 turns.
For a component weighing approximately 50 kg, begin with 1 full turn, then increase the height to 3 full turns.
These values should not be regarded as final settings. They are intended only as reference points to help establish an effective starting range for tuning.
The lower of the two suggested settings will typically produce a fuller, smoother and more substantial presentation. At the same time, it may also sound slightly slower, less energetic and lacking in rhythmic drive.
The higher setting will usually reveal more detail, openness and clarity, but potentially at the expense of tonal richness, body and weight.
If your listening impressions correspond broadly to these descriptions, the optimum Galileo setting is likely to lie somewhere between the two positions.
The goal of the next stage is to identify the point where the natural tonal richness and weight of the lower setting combine with the resolution, energy and openness of the higher setting.
Subsequent listening sessions – fine tuning
Once the upper and lower limits of the adjustment range have been established, you can begin the fine-tuning process.
If you start from the higher setting and the sound lacks tonal richness and body, lower the Galileo Isolation Feet by rotating the adjustment ring clockwise by four scale divisions (approximately 1/4 of a turn).
Conversely, if you begin from the lower setting and the sound appears overly relaxed, heavy or lacking in energy, raise the Galileo Isolation Feet by 1/4 of a turn, rotating the adjustment ring counter-clockwise.
After each adjustment, allow the system a short time to settle before listening again. Only then should you evaluate the changes and decide whether further adjustment is required.
Continue making adjustments in 1/4-turn increments until you notice that the sonic character begins to change in the opposite direction.
As the feet are adjusted upward, the presentation will gradually become more open and revealing. If it begins to lose its natural tonal richness and body, you have moved beyond the optimum setting.
Likewise, lowering the setting will gradually increase weight and tonal density. However, if the presentation becomes excessively warm, slower or loses its natural rhythmic flow, the optimum point has also been passed.
In either case, return slightly toward the previous adjustment range.
Once the optimum range has been identified within approximately 1/4 of a turn, reduce the adjustment step to 1/8 of a turn (two scale divisions) and repeat the listening process.
The higher the performance level of both the audio component and the system as a whole, the easier it will be to hear the changes introduced by Galileo.
After finding the optimum setting with an accuracy of approximately 1/8 of a turn, we recommend leaving the system in this configuration for one to two days.
During this time, Galileo and the supported component will continue to interact mechanically, allowing the entire system to settle into its new operating conditions. A subsequent listening session may reveal that one final, very small adjustment is beneficial.
Any final correction should be subtle—typically one scale division, occasionally two.
Avoid making large adjustments of 1/4 or 1/2 of a turn at this stage, as doing so is likely to move away from the optimum tuning point and require the tuning process to be repeated.
If Galileo Isolation Feet are used with multiple audio components, we recommend recording the optimum setting for each one. This allows the correct adjustment to be restored quickly whenever the system configuration changes, ensuring consistent listening results.
foot placement
Once the height adjustment has been completed, the final step is to optimize the placement of the isolation feet beneath the component.
The most common arrangement for a set of three Galileo Isolation Feet is a triangular layout, with either one foot at the front and two at the rear, or two at the front and one at the rear.
However, this configuration should not be regarded as the only correct solution.
Depending on the component’s construction, internal layout and weight distribution, an asymmetrical triangle may provide even better results.
Moving one or two feet by only a few centimetres can noticeably alter the way vibrations are transmitted through the component, leading to audible differences in performance.
Particular attention should be paid to the position of heavy internal parts such as the power transformer. Placing one isolation foot directly beneath the transformer may produce a different sonic result than positioning the feet so that the transformer’s weight is distributed between them. We encourage experimenting with several different layouts and selecting the one that delivers the most natural and coherent musical presentation.
result
When correctly adjusted, Galileo Isolation Feet allow the supported component to operate under optimum mechanical conditions by minimizing the influence of unwanted vibrations.
The result is improved resolution, greater transparency, more precise imaging and a more natural musical presentation.
Galileo has not been designed to alter the character of an audio component or artificially modify its tonal balance. It does not add bass or increase treble energy. Its purpose is to reduce vibration-induced distortions, allowing the component to reproduce the information contained in the recording with greater accuracy—including subtle musical details that were previously masked by mechanical interference.
SHARE YOUR EXPERIENCE
Every audio system is unique, which is why feedback from Galileo users is especially valuable to us.
If, during the tuning process, you discover interesting observations, develop your own adjustment method, or believe this guide could be improved, we would be delighted to hear from you.
Your comments and experience help us continue improving both our products and future editions of our user guides.
contact us: divineacoustics@gmail.com
Return to Galileo description: